Baofeng UV-5R Overview and Manual Programming
First it’s a scream of a deal at about $50/ea…if you want a VHF/UHF handheld Ham radio transceiver this is it. Visit Amazon for great deals (2x packages and more)
 |
| UV-5RE photo 1 |
The Baofeng UV-5R ia a multi purpose dual band ( vhf / uhf ) hand held transceiver made in China. It covers from 136 – 174 mhz. on vhf and from 400 – 480 mhz on uhf. ( Initially, coverage in uhf was 400 – 480 mhz., currently they cover from 400 – 520 mhz) . The power output is four watts in high power and one watt in low power on both bands. The UV-5R is a very popular transceiver in many countries and in the United States, its low cost ($50.00) makes it a very good alternative for newcomers into the hobby or as a second or backup handheld among experienced amateur radio operators. An amateur radio license, Technician class or higher is required to legally transmit with this radio in the U.S. With our without a license , the UV-5R is not legal for GMRS. GMRS requires Part 95 certification. It is illegal to use the UV-5R on GMRS , FRS and MURS channels in the U.S. The radio has an FCC Part 90 certification, so it is not compliant when used on Part 95 services. This topic has been widely discussed in the Baofeng UV-5R Yahoo group.The radio is available in different colors and case styles, models available include the UV-5R, UV-5R+, UV-5RA, UV-5RB, UV-5RC, UV-5RE and other variants. The main differences are the case style and the firmware versions, BFB-230 being the oldest and BFB-295/297 the newest. The firmware versions can not be upgraded. One of the most common problems with the UV-5R is the difficulty when trying to program it by hand. I will discuss the basic steps required to verify that your radio arrived operational and how to pre configure the menus for a trouble free manual programming.
 |
| UV-5RE photo 2 |
The first step is to check that all the items are inside the box : radio, battery, antenna, belt clip, desk charging cradle, desk charger power supply, earphone / microphone, lanyard and manual. The photo shows all the items that came with my UV-5RE firmware version BFB-293. To check your UV-5R firmware version, press number [3] key while powering the radio on. The firmware version (BFB) will briefly show on the display. The firmware version can not be upgraded.
 |
| UV-5RE photo 3 |
Side view of the UV-5RE, the speaker microphone connector is below the rubber cover. This connector is also used for programming the radio with a computer and software.Computer programming of the Baofeng UV-5R will be discussed in a future blog entry. For more information on programming the UV-5R via computer, visit the UV-5R Yahoo group or go to miklor.com
 |
| UV-5RE photo 4 |
Side view of the UV-5RE showing the “call” button , “ptt” switch (center) and “moni” button. A quick press of the call button changes the frequency mode to fm radio reception. A long press activates the alarm function. The push to talk switch (ptt) at the center is used for transmitting, the “moni” button below is used to turn on the built in flash light (led) on top of the radio (in this version it toggles between, flashing and always on) and opens the squelch when pressed longer. On older UV-5R’s, the flashing led option is not available.
 |
| UV-5RE photo 5 |
The following steps will let you discover if your radio is operational . When turned on make sure you see all display icons illuminate or a welcome display. After this is completed , the display will show two frequencies, one on the top, VFO-A and another on the bottom, VFO-B. Make sure your battery indicator is full (three bars) if not, charge your battery before proceeding with programming and the remaining tests. Press the orange button, VFO/MR, until the radio announces “frequency mode”. Press the blue VFO button (A/B) and select the upper VFO. Make sure your antenna is connected . Enter the frequency of the NOAA weather broadcast in your area using the keypad buttons, in Puerto Rico it is on 162.400 mhz. You should hear the weather broadcast through the speaker, adjust the volume to your preference.You can enter any other frequency you prefer, this step is just to make sure your UV-5R is receiving. Make sure you can enter and receive frequencies on both vfo’s. The photo shows the UV-5RE after entering 145.370 on VFO-A and 447.350 on VFO-B, both local vhf and uhf amateur repeaters respectively. If you are not sure of the NOAA weather frequency in your area , look for it on the internet or look for a list of amateur radio repeater frequencies in your area. The next steps will ensure your UV-5R is set up correctly for ham radio use and programming via the keypad. If you are looking for directions to setup your UV-5R on another radio service, familiarize with this procedures . Look for the frequencies you want to program first, remember that a license is required to transmit with this radio in the U.S. on both “ham” and commercial frequencies. No license is required to receive, but in order to prevent accidental transmission, there is no way to lock the push to talk switch on this radio, the only way of preventing the radio from transmitting accidentally is to program the transmit frequency to zero using the computer programming software.
 |
| UV-5RE photo 6 |
Press menu and scroll to item “SQL” using the up /down arrows or press , [MENU] and [0] . Make sure the value is other than “off” .Press [MENU] to save and then press [EXIT] . I prefer setting it at number two, if it is set to zero, the squelch is going to stay always open. The recommended value for this setting on the Miklor website is five.To change the value, press [MENU] again, the arrow will move pointing downward. Using the keypad arrows move the value to the desired level and press [MENU]. This will set your squelch setting. Remember that you can always keep the “moni” button pressed long enough to open the squelch. When menu is selected , there is a ten second time window, if you don’t complete the changes to the particular menu item, the radio will revert to “frequency mode” or ” channel mode” In that case you will have to press menu again to complete and save the changes.
 |
| UV-5RE photo 7 |
For amateur radio use the UV-5R’s step menu must be set to 5K or 10K. To access the step size , press menu and scroll to menu number [1] or press [MENU] and [1] press, [MENU] again to move the arrow down and pointing downward . Use the keypad arrows to set the correct step size, press [MENU] again to save, press [EXIT] to return to the normal display. The frequency steps available are : 2.5, 5, 6.25, 10, 12.5, 20, 25 and 50. On firmware versions BFB-290 and below the steps are : 2.5K[0] 5.0K[1] 6.25K[2] 10.0K[3] 12.5K[4] 25.0K[5] on firmware versions above BFB-291 the steps are : 2.5K[0] 5.0K[1] 6.25K[2] 10.0K[3] 12.5K[4] 20.0K[5] 25.0K[6] 50.0K[7] . The numbers in square brackets “[ ]” are shortcuts that can be used to directly select the value without having to scroll through the settings. In order to check your UV-5R firmware version , press number 3 while powering up the radio. The firmware version will show up briefly on the display.
 |
| UV-5RE photo 8 |
Menu [2] sets the power output of the UV-5R. The available levels are only high or low. In order to test if the transmitter is working, set menu 2 to high power, this is done by pressing [MENU] and scrolling to number [2] , or just press [MENU] and [2] , TXP will show on the display, press [MENU] to move the arrow pointing downward. Using the keypad up / down keys, select high, press [MENU] to save and then press [EXIT]. If you want to transmit and make some tests on “simplex” frequencies, just input the frequency desired and transmit, if an external power meter is available you can verify the output power of the UV-5R on both bands. For repeater operation the offset, shift and any tones required must be setup in the following steps first.
 |
| UV-5RE photo 9 |
 |
| UV-5RE photo 10 |
Menu [5], wide or narrow deviation must be set to wide, for ham radio use. After January 2013 all commercial transmitters must comply with the narrow standard in the U.S. If using the UV-5R in other services outside amateur radio frequencies, this setting must be changed to narrow.
 |
| UV-5RE photo 11 |
Menu [11] R-CTCS. Verify it is set to “off” for ham radio use.This menu is used to set a receive “continuous tone coded squelch system” or CTCSS in receive. If set to a value other than “off” (67.0 hz – 254.1 hz) the squelch on the radio will not open, unless the transmitting station is using the exact tone you have set for receive in this menu. The same applies with the R-DCS digital tone. Most amateur radio repeaters don’t re transmit the DCS or CTCSS tones, therefore both must be off in the UV-5R in order to receive all transmissions without problems.
 |
| UV-5RE photo 12 |
If the repeater you are trying to access requires a DCS tone. Enter it in menu [12] T-DCS. Available options are from D-023n – D754I. If the repeater uses a DCS tone and you don’t set it up correctly in this menu, you can not access the repeater. You probably will be able to receive it, but won’t be able to transmit using the repeater. If the tone is not known, the ARRL repeater directory is a good resource to find amateur radio repeater frequencies in the U.S. along with all information including , location, trustee, shift and if a tone is required
 |
| UV-5RE photo 13 |
If the repeater you are trying to access requires a CTCSS tone, enter it in menu [13] T-CTCS. In the photo I have entered a T-CTCS of 100 hz. to access the 447.350 repeater I have set in VFO B. You need to change menu 13 every time you want to program a frequency that requires a different transmit DCS or transmit CTCSS tone. Although when in frequency mode you can have separate DCS and CTCSS tones on each vfo, when programming the radio from the keypad, all programming must be done on the upper VFO- A. You can not program a memory from VFO-B when in frequency mode. For testing purposes, I always set VFO-A to a vhf frequency, shift to off, plus or minus , offset to 00.600 and the respective DCS or CTCSS transmit tone for the repeater I want to test. Then I set VFO-B to a uhf frequency, shift to off, plus or minus , offset to 05.000 and the respective DCS or CTCSS transmit tone for the repeater I want to test. Contrary to other ham radio handhelds from Yaesu, Icom and Kenwood , the UV-5R does not set the repeater shift or the offset automatically. They need to be changed in menu every time you move to a different frequency with a different shift direction, a different band or a different DCS or CTCSS tone. In the United States amateur radio repeaters in the two meter band (144 – 148 Mhz) utilize an offset of 600 khz. Above 147.000 mhz the shift is positive (600) below 147.00 mhz and on the 145.000 mhz repeater band the offset is negative (600) For simplex frequencies set the shift SFT-D (menu 25) to off.
 |
| UV-5RE photo 14 |
If for any reason your radio is announcing prompts in Chinese, check menu [14]. It can be set to off, Chinese or English. On firmware versions BFB-238 and below the options are : OFF or ON , firmware versions BFB 251 and above the options are : OFF , ENGLISH or CHINESE . Remember, once you select the menu item number, press [MENU] again to make the changes using the keypad up or down arrows and then press [EXIT]. There is no [F] key or enter like in other radios. The markings in blue next to the keypad keys are not secondary functions that are toggled with a function key, they are menu shortcuts. For example , if you want to set the squelch level to a different level, you can press [MENU] and then [0] , the UV-5R will go the menu item number 0, SQL . There are shortcuts to the most frequently used menu items.
 |
| UV-5RE photo 15 |
This is one of the important menu items [25] , SFT-D shift direction. It must be set to off for simplex operation, to minus ( – ) for a repeater requiring a negative shift, or plus ( + ) for a repeater requiring a positive shift. In the United States amateur radio repeaters utilize a 600 khz shift (.600) on the 2 meter band ( 144-148 mhz) and 5 mhz (5.000) shift on uhf (420 – 450 mhz.) On the uhf band all repeater shifts are negative, on 2 meters above 147.00 mhz they are positive (600) and below 147.000 mhz , negative (600) Always consult the band plan to make sure you are operating on the amateur radio bands according to FCC rules and following the emission privileges for each particular band segment. In the above photo I have set the UV-5R for a minus repeater offset.
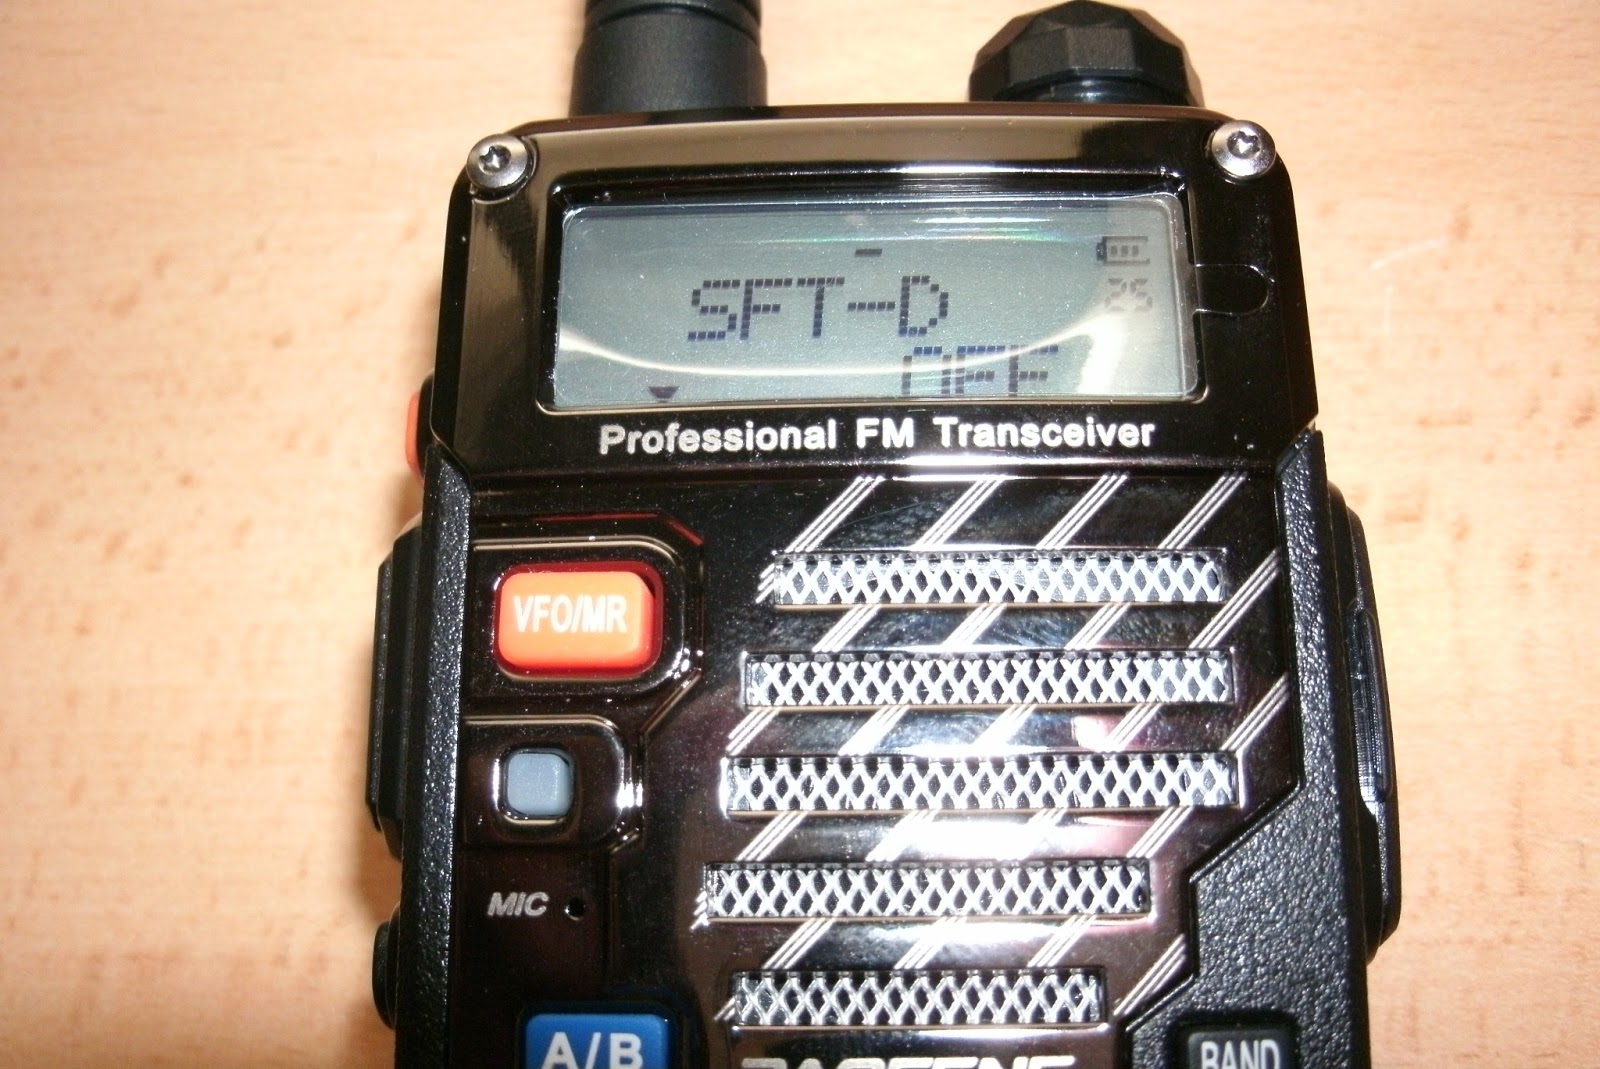 |
| UV-5RE photo 16 |
Now I have changed menu [25] SFT-D to off. Always use off to transmit in a simplex frequency (no shift). In the U.S. the national simplex calling frequency in 2 meters is 146.520 On uhf it is 446.000 mhz. For example to test the UV-5R on 146.520 simplex, go to menu [25] and set SFT-D off , then enter 146.520 on the keypad (in frequency mode) the radio will receive on 146.520 and when the “ptt” switch is pressed , it will transmit in the same frequency, 146.520. To test a repeater frequency, lets take for example the KP4IA repeater ,145.370 mhz. A minus 600 khz shift is needed to work this repeater. The repeater transmits on 145.370 and receives 600 khz below ( 144.770) The UV-5R needs to do the opposite, receive on 145.370 mhz and transmit on 144.770 mhz. That is the purpose of the minus 600 khz shift. If the shift direction [SFT-D] menu item is set to off, the radio in this case will transmit on the same frequency the repeater transmits (145.370) . The idea of a repeater is to extend the range of portable and mobile radio transceivers. The repeater is usually located in a very high location, providing good coverage, even line of sight in many cases to a large area, as long as your signal reaches the repeater it will get re-transmitted so other portables or mobile stations and even base stations far away can receive the signal. The range of the UV-5R in simplex frequencies is going to be determined by the height above terrain, the antenna, power level and obstructions between both radios.
 |
| UV-5RE photo 17 |
The photo shows another important menu item , [26] (offset). Press [MENU] and then [26] , with the keypad , enter the corresponding repeater offset and press [MENU] to save then press [EXIT] . Use 00.600 on vhf amateur radio repeater frequencies and 05.000 on uhf amateur radio repeater frequencies in the United States.
 |
| UV-5RE photo 18 |
For amateur radio use, menu [35] STE should be set to off for repeater use. STE stands for “squelch tail elimination” It is intended to be used for simplex mode between multiple UV-5R’s
 |
| UV-5RE photo 19 |
For amateur radio use, menu [36] RP-STE must be set to off. RP-STE stands for” repeater squelch tail elimination” and practically no amateur radio repeater uses this feature.
 |
| UV-5RE photo 20 |
Now the tricky part, programming from the keypad. Notice the I have not programmed any frequencies into the UV-5RE yet. I have just pre configured the menu items and conducted receiving and transmitting tests on both vfo’s , A and B, to verify that the radio was received from the dealer in working condition. Contrary to other amateur radio transceivers like Yaesu, Icom or Kenwood for example, that set the shift and offset automatically according to the U.S. band plan, in the UV-5R these menu items have to be changed manually. The first step programs the receive frequency, power level, DCS or CTCSS tones along with other data. After the receive frequency is entered , you must enter the transmit frequency to the same memory channel. This is the critical part that many operators fail to understand , they end up programming a simplex channel even though the offset and shift directions are set correctly. In frequency mode you can have VFO-A set to a particular offset and shift , the same applies to VFO-B. Frequencies can be entered directly with the keypad on both vfo’s , the radio will receive and transmit according to the offset and shift selected with menu [25] and [26]. When programming a channel it is very important to remember that it must be done from VFO-A and not from VFO-B. When a frequency is programmed using menu [27] , the radio makes that frequency your transmit and your receive frequency. In other words, programming just one time with menu [27] creates a simplex channel. If the frequency being programmed is a repeater channel , it is necessary to enter the transmit frequency using menu [27] a second time. This second entry with menu [27] to the same memory channel overwrites the transmit frequency ( which was set by the radio same as the receive frequency) on that memory channel and creates the repeater receive frequency which is the UV-5R transmit frequency. Power level , DCS or CTCSS tones along with other data is programmed along with the receive and transmit frequency entries. (see menu 27 explained). Overwriting to a memory channel only updates the transmit frequency along with menu [12] T-DCS and [13] T-CTCSS. The receive frequency and the other menu items programmed along with it the first time are not updated. Use menu [28] DEL-CH if you need to make changes on the receive frequency and its associated menu data or made errors during programming.
IMPORTANT
ALWAYS PROGRAM THE UV-5R FROM THE UPPER DISPLAY VFO-A AND IN FREQUENCY MODE . IT WILL NOT PROGRAM FROM VFO-B OR WHEN IN CHANNEL MODE. USE THE VFO/MR ORANGE BUTTON, TO CHANGE BETWEEN THEM . IF CHANGED TO CHANNEL MODE TO VERIFY THE CHANNEL WAS PROGRAMMED CORRECTLY. REMEMBER TO PRESS THE VFO/MR BUTTON AGAIN TO RETURN TO FREQUENCY MODE AND CONTINUE WITH PROGRAMMING . MENU [25] SFT-D AND [26] OFFSET ARE ONLY USED WHEN OPERATING WITH THE UV-5R IN FREQUENCY MODE AND FROM VFO-A OR VFO-B . THEY ARE NOT USED WHEN PROGRAMMING A MEMORY CHANNEL UNLESS THE OPERATOR WANTS TO USE THE [SCAN] KEY SHORTCUT TO SET THE TRANSMIT FREQUENCY. THE SCAN KEY SHORTCUT MAY NOT WORK IN RADIOS WITH OLD FIRMWARE VERSIONS.
PROGRAMMING TIPS
In order to successfully program the UV-5R it is very important to get organized. Prepare the list of frequencies to be programmed along with the memory channel numbers (000 – 127) , power level , receive DCS or CTCSS tones, transmit DCS or CTCSS tones, deviation (wide or narrow) , scan preference, busy channel lockout, frequency to VFO assignments, etc. Remember simplex channels are one frequency only and can be programmed quickly in just six steps. For repeater channels, have both , the receive and transmit frequencies, organized to reduce errors while programming. Follow the instructions below for simplex and repeater memory channel programming. Make sure that you understand how the Baofeng UV-5R menu structure works especially menu [27]. Program a few memory channels first using the instructions provided below and get familiarized with the procedures before considering extensive memory channel programming.
MENU 27 EXPLAINED
Programming simplex frequencies to a memory channel only requires one step , save the receive frequency to a memory channel using menu [27] , the radio will make that frequency, your transmit frequency. For repeater frequencies , set menu item [25] to either a plus or minus shift depending on the repeater and always use 00.600 on menu item [26] on vhf and 05.000 on uhf only if you prefer to program using the reverse key shortcut. Programming repeater frequencies to a memory channel requires two steps. Step one : Program the receive frequency with menu [27] to a memory channel and exit from menu. Step two: Change the frequency to the transmit frequency, either entering it with the keypad ,or using the reverse key function (scan button) . Program again using menu [27] to the same memory channel . Menu [27] has two modes : Mode 1- writing to empty channels and Mode 2- writing to non–empty channels. In Mode 1, writing to an empty channel stores the VFO A frequency into the receive and transmit registers of the target channel. At the same time, the following menus are stored : [2] , [5] , [10] , [11] , [12] , [13], [17], [19] , [23] and [33]. In Mode 2 , writing to a non-empty channel stores VFO-A into the transmit register of the target channel. At the same time , the following menus are stored : [12] and [13].
SIMPLEX PROGRAMMING EXAMPLE
REPEATER PROGRAMMING EXAMPLE
STEP 1 : ENTER 145370 (while in frequency mode to VFO-A)
STEP 2 : PRESS [MENU] [27] (“mem channel” appears on display)
STEP 3 : PRESS [MENU] ( radio announces ” memory channel”)
STEP 4 : ENTER [002] (use the keypad or scroll to it with arrow keys)
STEP 5 : PRESS [MENU] (radio announces “receiving memory”)
STEP 6 : PRESS [EXIT]
STEP 7 : ENTER 144770
STEP 8 : PRESS [MENU] [27] (memory channel 002 still on display)
STEP 9 : PRESS [MENU] (radio announces ” transmitting memory”)
STEP 10 : PRESS [EXIT]
REPEATER PROGRAMMING EXAMPLE
* Assuming the display mode ( MENU [21] or MENU [22] ) for the selected display is set to ” FREQ ”
If everything is correct you now have 146.520 simplex, on memory channel 001 , 145.370 / 144.770 on memory channel 002 and 147.210 / 147.810 with a transmit T-CTCS of 127.3 in memory channel 003. If there are errors on the programming or if it did not program correctly, the UV-5R will let you overwrite a memory channel with the transmit frequency along with menu items [12] and [13] only. It won’t let you overwrite the receive frequency and all the other menu items associated to it.( see menu 27 explained). If changes to a simplex channel or both frequencies of a repeater channel are needed , delete the memory channel programmed using menu [28]. This is the only way it will let you program to the same memory channel again. You can update the transmit frequency along with your transmit DCS or CTCSS tones to a programmed channel as often as needed.
If all information to be programmed is organized , constant changes to the menus associated with the receive and transmit channels are minimized. Group your channels by simplex, repeaters with a positive shift, repeaters with a negative shift, repeaters with tones, repeaters without tones, vhf and uhf repeaters. Always prepare a list of the frequencies to be entered along with the necessary information, shift, offset, tones, deviation , power level, etc, to make the manual programming easier. The power level can be set for each frequency to be memorized utilizing menu [2] TXP (tx power, options available are high , 4 watts or low, 1 watt). You can program all your memories in low power if you prefer and use the [ #] key to toggle between high and low power. This works for all firmware versions, but TDR must be set to “off ” on firmware versions BFB-251 and lower. The UV-5R has forty menu items, I have only covered the critical ones to ensure successful manual programming .
The remaining menu items used to customize even more the UV-5R will be discussed in a future blog entry. Programming with computer and software is easier, but has its problems. Due to the wide variety of Baofeng UV-5R firmware versions, be sure you are using the correct one for your radio, either CHIRP, Baofeng OEM or Baofeng VIP or you will end up with a non working radio. The serial usb cable used for programming needs to have the correct drivers installed, and depending on the operating system you are using (Windows XP, Vista, Windows 7 ,Windows 8, etc) the process can get frustrating. Even more frustrating than the manual programming process. More information on the Baofeng UV-5R radio can be found on the Yahoo group or at miklor.com. A short video showing some programming examples with the UV-5RE will be added to this article later. It is very hard to capture the programming sequences in photos. I hope this information helps other radio amateurs understand and sucessfuly program the Baofeng UV-5R. Any questions or comments can be posted directly to the blog